Genuine Curiosity

Author Dwayne Melancon is always on the lookout for new things to learn. An ecclectic collection of postings on personal productivity, travel, good books, gadgets, leadership & management, and many other things.


Pack a sport coat, suit coat, or blazer without wrinkling

Last week, I shared some of my tips for packing without wrinkling.  I mentioned the Eagle Creek’s Pack-It Folders that I love, and stated you can use them for dress shirts, pants, and jackets.  That is true, but I stopped using them for jackets in favor of another method.

You see, I am tall, and have wide shoulders, so my jackets didn't fit inside the Pack-It folders very well.  I now use the method shown in the video below.​

This method works very well and I use it all the time.  When you arrive at your hotel, simply unfold and hang the jacket in your closet, and it will look great the next morning.​

​This method has another advantage - if you decide you want to toss your jacket into your suitcase (to be more comfortable on the plane, for example), you simply fold it like this, open your suitcase, put the jacket inside on top of your other clothes, and carefully zip the suitcase shut.  Very simple.

Pack Without Wrinkles - New Updates

Note:  Packing without wrinkles is something I've written about quite a bit, and I wanted to take some time to provide some updates.

As a frequent traveler, I want to share some packing tips that have helped me stay free of wrinkles. I have tried many methods including a classic method detailed on the Men’s Wearhouse site; steaming my clothes in the bathroom on arrival, voodoo, etc. None of these methods quite did the trick, even with wrinkle-resistant clothing (see my note at the end of this article).

My wrinkle-free status improved significantly recently, when I discovered Eagle Creek’s Pack-It Folders. These are phenomenal for keeping dress shirts, pants, and jackets wrinkle-free in your luggage (they also work with skirts, but I haven’t tried that).

Eagle Creek also offers Pack-It Cubes, which I use for general organization (you’ll see how it all works together to tidy up my suitcase, below).

 The Pack-It Folders come with a sturdy plastic folding board, which has detailed folding instructions printed on it. The diagrams on the board guide you through the folding process, and are very easy to follow.

Folding a dress shirt with the Eagle Creek Pack-It Folder 

Click thumbnails for larger view

  • Start by buttoning a few buttons on the shirt (I button the top, third, and 6th buttons), smooth it out, and place it buttons-down on a flat surface. Then, fold the right sleeve across and fold the sleeve down at an angle, as shown in this picture.

  • Next, fold the other sleeve across the folding board, then angle the sleeve down just like you did for the first – as shown here.
  • Next, fold the tail of the shirt up to the collar (the board forces you to fold it in the right spot), then flip the shirt over, place it in the center of the Pack-It Folder, and remove the board. You now have one neatly folded shirt.

  • You can fold several and stack a number of shirts (the number depends on the size Pack-It Folder you are using). When you’re done, you place the folding board on top of the whole stack to help keep everything flat.
  • Next, fold the flaps closed on the Pack-It Folder to make a nice, tidy bundle.

The Pack-It Folder and the Pack-It Cubes work together to make a very tidy suitcase. And, when you reach your destination, you can unpack and things look almost as crisp and fresh as when you got them back from the cleaners. Click the image for a tagged version of what’s what in the picture.

Note: For maximum effectiveness, I recommend buying wrinkle-resistant dress shirts and pants. I prefer Lands’ End or Nordstroms' line of "Smart Care" shirts as they come in exact sizes and are fantastic when it comes to shedding wrinkles. As a bonus, they are also stain resistant!

Next time, I'll share how I deal with jackets (suit coats, sport coats, etc.)​

Seeing the World With a Backpack

I've traveled a lot on business, but have always been intrigued by the idea of traveling the world for fun.  A couple of sets of friends of mine have done just that:

  • Tom Andrus took his whole family around the world on a very reasonable budget, which you can read about on his  "Six In The World" site;
  • Warren and Betsy Talbot not only did the same thing, they have written books about how to go about it, which you can find out more about via their "Married With Luggage" site.
Tips for Smooth Business Travel.jpg

When you think about international travel - even on a smaller scale than that of Tom, Warren, and Betsy - one of the big questions is how to travel affordably. After all, anyone who has been on vacation recently knows it can be an extremely pricey experience.

In order to see the world in a more budget-friendly way, many people are intrigued by the idea of embarking on a backpacking adventure. Instead of staying at hotels, urban backpacking trips typically involve staying in hostels, which can save travelers thousands of dollars. But before you call the airlines and book your flight to Europe or wherever your case of wanderlust inspires you to go, it’s a good idea to take a little time beforehand and consider how backpacking and hostel vacations are different from a suitcase and hotel excursion.

Traveling Suggestions

The first thing to decide is if you want to travel alone or with a group. While having the freedom to go where you want and see what you want is appealing, there's also safety in numbers. Speaking of which, travelers should make it a point to protect their identity while they're away; for example, signing up with Life Lock before heading on vacation is a good idea, as is investing in a money belt and keeping your passport well-protected.

Most hostels will have lockers, but it doesn't hurt to pack some security accessories. Pacsafe Locks both cover and secure your pack to keep it from being stolen or tampered with.
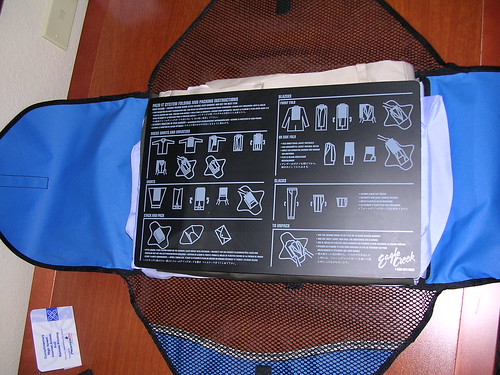
Packing a Backpack

Packing a backpack for a vacation takes time and preplanning. As an article on the Wild Backpacker website noted, the first order of business is to purchase a backpack that'll fit all of the clothing, supplies and other gear you'll need. Even if, you already have an older backpack that will hold a lot of items, the article suggests investing in a newer, more lightweight model that will still hold a ton of stuff while also saving your back.

In order to pack everything properly, travelers should lay out everything they intend to bring in one spot. For instance, if you're going outside of the United States, you’ll probably want to bring a travel adapter, as well as a headlamp, at least one pair of extremely comfortable yet sturdy shoes, and the correct kind of clothing, for the climate you’ll be visiting. Once you have everything you need gathered together, the Wild Backpacker article suggests loading your pack with the lightweight items at the bottom, than medium-weight, and then finally the heaviest items. Fill all empty spaces with your smaller items like a GPS, snack foods, bug spray and toiletries.

For anyone who is unsure about what to expect, an article that appeared in the Huffington Post offers a first-hand account about the many benefits of staying in such affordable accommodations. In the author’s experience, hostels are clean, welcoming and hospitable places to stay, filled with friendly staff and guests. Many hostels tend to have staff on-site 24 hours a day, which helps with security. Hostels are also extremely easy on the wallet, costing as little as a few dollars a night.

With a little preplanning and a sense of adventure, it's certainly possible to get out and see the world for far less than a typical vacation.

Make your own backpack file folders

I have a few travel bags I like to use, and one of them is a backpack (it's the one at right - I like it because it has a laptop sleeve and an iPad slot).  The problem is, when I first started using it, I'd put my folders into my backpack, where they only fit in sideways and all my stuff would fall out ​and get all mixed up in the bottom of the bag.

A long time ago, I saw some backpack-friendly backpack folders, but I haven't been able to find them in the recent past. So, I decided to make my own.​  I experimented with several approaches and thought I'd share what I learned with you.

Find the right folder

I tried several approaches:

  1. Folder jackets:  These are essentially sleeves that you put your folders in or use as standalone pockets. They are slightly larger than normal folders, and only open on one side.  They worked OK, but I found I had to remove them from my backpack any time I wanted to put something in, or take something out.  I still use one of them for supplies (post-it notes, notecards, stamps, extra business cards, envelopes, pen refills, etc.) and it works fine for that purpose, as I don't have to get at those items very often.
  2. Paper folders: These work OK, but don't last very long.  The seams give way much too soon for my tastes.​
  3. Plastic folders:  These are excellent.  The best I've found are the GTD folders from David Allen Company - they are heavy duty plastic and I've been using the same set for about 4 years now.  I tried other, lighter weight plastic folders from office supply stores but they weren't tough enough.​  The David Allen folders are  color-coded, very sturdy, and come in both A4 and US Letter sizes.

Plug the leak

Once you have your folders, you need to "plug up" one side of them so they contain your papers, cards, etc. when they are put in your backpack sideways.  To do this, you simply close up one side with tape.  My first attempt was on my Inbox folder (at right) and I used duct tape - at the time, all I had was teal-colored tape.  This worked fine, but I have found that the duct tape tends to peel sometimes or stick to other things.​

For the rest of my folders I used heavy-duty, clear packing tape, which is now my favorite.  This is the thicker variety of tape that feels more vinyl-like than plastic.  It lays down flat, and is very strong.​   Cosmetically, the clear tape is more appealing - as you can see in the picture of my Receipts folder, below - the clear tape is on the right, and you can barely see it.

When you apply the tape, keep the edges of the folder together pretty tightly - if you leave a gap, you'll expose some adhesive and it will stick to your papers and attract dirt & paper dust.  ​

Label for easy filing

The final step is to add labels so you can tell which folder is which while they are safely tucked into your backpack.  I used my label maker to create small folder names (the names match the names on the "normal" folder tabs on the long edge.  I put them so I can read them while they are in my backpack and simply slip items into the proper folder without removing them - this is particularly handy for my Receipts folder and my Inbox folders.  See below for an example of how easy it is to read them from the end when you use this approach.​

​So, there you have it - easy, do-it-yourself folders for your backpack.  By the way, when I use my "normal" briefcase, I use these exact same folders.  They work just fine with one side taped up.

Travel Survival Tip: Dealing with blisters on your heels

On more than a few occasions, I've worn new shoes on a business trip and been miserable because my heel(s) developed blisters because the shoes weren't broken in yet.  It makes for a miserable trip.  Fortunately, you don't have​ to suffer.

Moleskin to the rescue

Several years ago, I discovered that there was a great solution to this problem: Moleskin (not to be confused with the Moleskine notebooks - they are a completely different thing).​ Before discovering moleskin, I used Band Aids, but they just didn't stay on very well.

Moleskin is a felt-like fabric with an adhesive coating on one side.  You can find it at most pharmacies, or stores with pharmacies in them (such as many grocery stores and Target).​  It is in the foot care section, along with show inserts, corn pads, and things like that.

To use it, simply cut a square that will cover your blister (or the red area where a blister or "hot spot" is developing), apply it directly to the skin over the blister, then put your socks and shoes back on.

If you already have a blister, it will still hurt, but it won't get worse, and it won't hurt as much.  If you don't have a blister yet, moleskin can keep one from developing.​

Each day, replace the square with a fresh pad.  I find that the moleskin is easier to remove if I take it off after my shower - it's waterlogged anyway at that point, so it is a great time to apply a fresh pad.​

Keep putting it on there until the blister is healed, or your shoes no longer hurt your feet.​

​Plan ahead for more pleasant travel

With moleskin, it can pay to plan ahead.  You see, moleskin is sold in larger sheets or rolls so you need to cut it -- that can be challenging these days, since it is difficult to travel with scissors.

I buy moleskin and cut it into small squares (roughly 1" square, or 2.5cm square) and put them into my laptop bag so I have some handy if my shoes begin to irritate my feet. This has helped me on at least 4 occasions I can remember, and I make sure moleskin is a permanent part of my travel gear.